My Self Hosting Stack in 2023
Why Self-Host ?
- Make use of the Raspberry Pi I had laying around.
- Experiment with some DevOps stuff.
- Feels cool to have a server running 24x7 in your home.
Architecture
Wanted to keep this as simple as possible.
- The Rpi is hooked directly into my wifi router using an ethernet cable.
- The router is configured to assign a static private IP to the Rpi.
- Cloudflare Tunnels to expose the Rpi to the internet quite securely.
- this is completely free ! (as of writing this)
- More details explained in the
Softwaresection below.
Pure vs Impure Self-Hosting
I understand that relying on a third-party service like Cloudflare, is not actually self-hosting of the purest form. But I am okay with this impurity based on the time saved and features provided.
Hardware
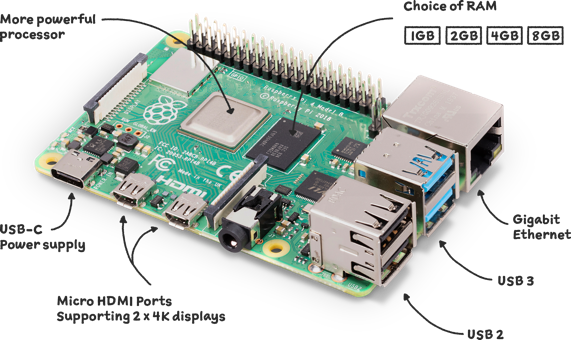

- Raspberry Pi 4 Model B Rev 1.2
- Has 4GB of RAM and 4 core 1.8 Ghz CPU
- Provisioned to run Raspbian OS (64-bit)
- I am able to run almost all
arm64docker images on the pi.
- I am able to run almost all
- 32 GB sdcard for persistent storage (SanDisk Extreme 32GB microSDHC UHS-3 Card)
- Argon ONE V2 Case
- Integrated fan really helps in keeping temperatures under control
- Using
argonone-configI can map fan speeds to different CPU temperatures.
- Using
- Prevents dust build up
- All ports are neatly accessible on one side
- Integrated fan really helps in keeping temperatures under control
Software
Development
I wanted to setup a development environment similar to the setup on my work Macbook. Here are few things:
- Shell: zsh
- Editor/IDE: neovim (Specifically Astronvim)
- I had to compile neovim from source because there were no ARM v7 releases for that.
- tmux
- Pretty much standard to allow long running shell sessions.
- Can have native iTerm experience with
tmux -CC. More info here
Hosting
- Cloudflare Tunnels do the heavy lifting for exposing the pi to the internet.
- A daemon runs on the pi which opens a persistent connection with cloudflare infra. The cloudflare infra then receives requests from the internet and forwards them onto your pi via the daemon.
- You can expose multiple services via a single tunnel and also restrict public access via authentication.
- Watch this for more info.
- A SystemD service unit file spawns the daemon on every boot.
- Docker
- I am running all my containers with
--restart=unless-stopped. This will auto run the containers after boot. Check this for more info.
- I am running all my containers with
- Deployment
- I run
nginx:alpinecontainer which has the blog’s codebase mounted as a volume during runtime. - Since this is a static website, I just go into the directory and do a
git pulland the new version becomes active.
- I run
Monitoring and Analytics
- Plausible Analytics running on the Pi to gather web analytics.
- n8n is setup to monitor services and run other workflows
- This is integrated with my Telegram account which acts as a central place to receive notifications
- I plan to add more workflows in the future for personal projects here.
- Cloudflare Tunnel Notifications
- This is a neat feature where you will get notified if pi loses internet connectivity.
- For metrics I run Prometheus on the pi to collect them with a retention of 30days
- It can collect the pi metrics (temperature, cpu, ram, etc) and also collect metrics from the docker daemon about running containers.
- Once I am able to get the hang of PromQL, I will be Using Alerts.
- Also I have a small script which periodically updates my about page with my server’s stats.
Future Work
Obviously the things documented in the blog are just the current state and these things will keep on evolving. Here are few things I have in mind:
- Setup Grafana to create dashboards from prometheus metrics.
- Backups (probably using restic)
- Related to the above, I thing I would like to look into is automating provisioning of the pi server(s) from scratch.
- IMO the playbook or recipe based approaches are difficult to test from scratch, so I would prefer some “image” based approach (where I can change hostname etc).
- Setup log2ram to buffer writes to the sdcard.